Hardware Requirements
The minimum hardware configuration for installing and running the SDK is:
• 1 GHz processor (minimum IDE and OS requirement of processor is 500 MHz)
• 1024 MB RAM
• 16-bit color
• 1024x768 resolution
• 2 GB free hard disk space
• A Microsoft Windows compatible sound card (required for audio support)
• Keyboard and mouse
Software Requirements
The minimum software requirements for installing and running the SDK are listed below.
• Active Perl version 5.6.1 (see Section "ActivePerl installation" for details); - 'perl -v' command can be used to find existing perl versions
• Java Runtime version 1.5.0 (see Section "Java Run-Time installation" for details); -'java -version' command can be used to find existing java versions
• ARM RVCT compiler 2.2 build 593 or newer is supported for ARMV5 compilation.
The following operating systems are supported:
• Microsoft Windows XP Professional SP2
• Microsoft Windows Vista Business (For limitations refer to release notes).
Additional Installation Requirements
• All installations must be performed using an administrator account. Otherwise, some environment variables may not be set correctly.
• The SDK must be installed in a path that does not contain any whitespace characters.
• The SDK, IDE and your project files must be located on the same logical drive as build tools to work correctly in all situations.
Prerequisites
Before installing the SDK you should have installed and configured:
• Perl (see Section "ActivePerl installation" for details)
• Java (see Section "Java Run-Time installation" for details)
• All peripherals you are going to use (see Appendix B: Supported Accessories)
All installations should be performed with an account that belongs to local administrators group. You should close all other applications before starting the installer.
ActivePerl installation
ActivePerl 5.6.1 is required and must be installed before installing this SDK. You can download ActivePerl from the ActivePerl pages. See ActivePerl documentation for installation instructions.
ActivePerl must be installed on your computer with administrator rights. Otherwise the PATH environment variable is not set correctly.
Java Run-Time installation
Java Run-Time (JRE) 1.5.0 is required to use emulator Preferences and other Java components.
Java Run-time can be downloaded from Sun Developer Network Downloads. (JRE is included in J2SE.)
JRE must be installed on your computer with administrator rights. Otherwise the PATH environment variable is not set correctly.
Running the SDK Installer
• Start the SDK installation by running the installation executable setup.exe located in the SDK delivery ZIP file.
If S60 5th Edition SDK v0.9 is installed, the installation is aborted, prompting the user to uninstall the S60 5th Edition SDK v0.9:

S60 5th Edition SDK v0.9 can be uninstalled in the Add-Remove Programs. S60 5th Edition SDK v1.0 cannot be installed until S60 5th Edition SDK v0.9 is uninstalled
The below InstallShield Wizard panel appears if S60 5th Edition SDK v0.9 is not installed

2.Click the Next button to continue.
The License Agreement dialog is displayed:
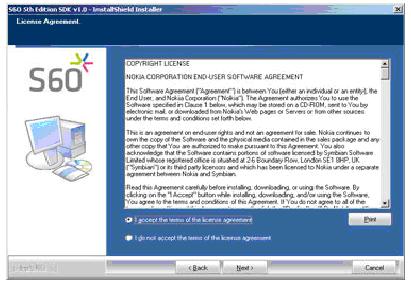
Read the license agreement carefully.
3. After reading (and accepting) the license agreement, click the I accept the terms of the licensee agreement radio button and click Next
Note: If you do not accept the license agreement, installation of the SDK is aborted.
The Setup type and destination folder dialog is displayed:

The SDK installer provides the following installation options:
• Typical: Installs the most common, default elements with the SDK. These include documentation (C++ and MIDP), example applications, development
tools and IDE integration elements (documentation plug-ins). This is the recommended installation option.
• Compact: Installs a restricted set of features. These include emulator and development tools.
• Custom: Allows you to select which features to include in the SDK (see step 4 below for a list of installation options).
Select the type of installation that you want by clicking the appropriate radio button.
If you do not want to install the SDK to the proposed default directory (C:\S60\devices) you can browse the installation directory by clicking the Browse button.
Note: The installation directory should not contain whitespaces.
Note: As the installation directory must be same as the name of the device, the installer always creates an S60\devices\S60_5th_Edition_SDK_v1.0 directory under the selected directory.
Once you have selected the installation type and (possibly) defined the installation directory, click Next.
• If you selected the Typical installation option, proceed to step 5.
• If you selected the Compact installation option, proceed to step 6.
• If you selected the Custom installation option, proceed to step 4.
4. If you selected the Custom installation option, the Select Features dialog is displayed

Select Features dialog
The options are:
• CPP--CPP Features
o C++ Documentation -C++ specific documentation
o C++ Examples -C++ examples
o Dev tools for C++--This contains all the CPP API headers and compiler toolchains for WINSCW and ARM build
o IDE Integration -Integrate SDK documentation into Carbide.C++
• MIDP--MIDP Features
o MIDP Documentation -MIDP specific documentation
o MIDP Examples -MIDP examples
o Dev tools for MIDP -It contains binaries and Java APIs for MIDP development
o IDE Integration -Integrate SDK documentation into Eclipse and Netbeans
• COMMON--This contains all the common components required for both CPP and MIDP application development
o Common Documentation -Common documentation.
o Symbian Examples -It contains Symbian C++ examples
o Common Tools -This contains S60 tools such as MBM viewer,S60 BT driver,ECMT etc..
o Icon -Common icon
o Emulator -Emulator
o OpenC plugins -This contains the headers,libraries,Glib sources etc for OpenC and OpenC++ application development
Click the features that you want to include in the SDK installation and click Next.
5. The Choose Destination Location dialog is displayed:

: Choose Destination Location dialog
Define your Eclipse installation directory by clicking Browse and then Next
C++ users may skip this stage by clicking NEXT button, as JAVA documentation is not relevant for C++ developers
Note: This dialog is only displayed if you selected the Typical installation option or selected IDE integration in the Custom installation.
6. The Ready to Copy Files dialog is displayed. Click Next to start the SDK installation. (If you want to modify the installation settings, click Back and modify them as needed.)
The SDK installation status is displayed in the Setup Status dialog

Ready to Copy Files
7. The Start Copying Files dialog is displayed. Click Next to start the SDK installation.
The SDK installation status is displayed in the Setup Status dialog:

Setup Status dialog.
8. If you already have other SDKs installed on your PC, the InstallShield Wizard will prompt you to select one of them as the default SDK. Select the appropriate SDK in the following dialog and click Next.

Select default device dialog
9. If you do not have the CSL ARM Toolchain installed on your PC, the following dialog will appear, prompting you to install it:

CSL ARM Toolchain installation prompt
As the CSL ARM Toolchain contains for example the GCCE compiler needed to build S60 applications for real devices, click Yes to the question and follow the instructions of the CSL ARM Toolchain installation wizard.
Once the CSL ARM Toolchain has been installed, proceed to step 10.
10. To complete the installation, click Finish in the Installation complete dialog.

The SDK is now fully installed on your PC. You can verify this through the Windows Start menu by, for example, opening the SDK Help by selecting Start > All Programs > S60 Developer Tools > 5th Edition SDK > v1.0> SDK Documentation.
More detailed instructions on how to verify the SDK installation that you have just performed are provided in Chapter "Verifying SDK Installation".
Verifying command line tools
To check that SDK command line tools function correctly, you can go through the following sequence:
1. Open the Command Prompt.
2. Set the S60 5th Edition SDK v1.0 as the default device with the devices command:
devices -setdefault @S60_5th_Edition_SDK_v1.0:com.nokia.s60
3. Go to the directory that contains the Hello World Basic example application. In a default installation it can be located with the cd command:
4. Use the cd command to go to the group directory:
cd group
The group directory contains the bld.inf and helloworldbasic.mmp files.
5. Enter the bldmake bldfiles command. This generates the necessary build directories.
6. Enter the abld build command.
The build script starts the make command that will both compile and link the application for the emulator.
7. If your environment has been set up correctly, the build goes through without errors and you can run the Hello World Basic application in the emulator by issuing the epoc command. (Notice that it may take a while for the emulator to open.)
The emulator starts and displays the application grid. To verify that the Hello World Basic application has been properly compiled and can be run on the emulator, do the following:
o Use the five-way navigation key of the emulator to navigate to the Installed folder in the emulator’s application grid.
o Open the Installed folder by clicking the center of the five-way navigation key.
o Once the Installed folder has been opened, use the five-way navigation key to locate the Hello World Basic application icon.
o Open the Hello World Basic application by clicking the left soft key under Options and by selecting Open from the list of menu options that are displayed.
Locating and opening the Hello World Basic application in the emulator’s application grid means that the application has been compiled and can be run on the emulator. In other words, the command line tools of your SDK installation are OK.
Verifying IDE configuration
To check that the SDK functions correctly with an IDE, you can go through the following sequence (the IDE used in this example is Carbide.c++).
1. Start the Carbide.c++ IDE.
2. Once the Carbide.c++ IDE is opened, it should display a message informing you that the Carbide.c++ documentation plug-in has been discovered. Click Restart.
3. Once the Carbide.c++ IDE is restarted, go to Help > Help Contents and verify that the SDK Help is included in the Carbide.c++ Help system.
4. In the Carbide.c++ IDE, go to Window > Preferences... > Carbide.c++ > SDK Preferences and verify that the SDK is listed in Available Symbian OS SDKs.
Configuring the Emulator
Once the SDK has been installed, you need to configure Bluetooth and Ethernet for the emulator. For detailed instructions on how to do this, please refer to the Emulator guide in the SDK Help. The SDK Help can be opened through the Windows Start menu by choosing Start > All Programs > S60 Developer Tools > 5th Edition > v1.0 > SDK Documentation.
Uninstalling the SDK
To uninstall the SDK, do the following:
1. In the Windows Start menu, go to Start > Settings > Control Panel.
2. In the Control Panel double click the Add/Remove Programs icon.
3. In the Add/Remove Programs window, select the S60 SDK from the list of currently installed programs.
4. With the S60 SDK selected, click Remove.
The InstallShield window opens.
5. When prompted to confirm that you really want to uninstall the SDK, click Yes.
6. Once the SDK has been removed from your PC, InstallShield informs you of this: Click Finish to exit the InstallShield application.
Note: Always uninstall the SDK through the Add/Remove Programs application, as described above. Do not attempt to remove the SDK contents manually. For example, in the Windows Explorer.
However, if you have used the emulator prior to uninstalling the SDK there may remain some SDK-related files and folders in the C:\S60\devices\S60_5th_Edition_SDK_v1.0 directory even after removing the SDK through the Add/Remove Programs application. These files and folders need to be removed manually by, for example, deleting them in the Windows Explorer.
No comments:
Post a Comment